Thursday, March 23, 2006

Project completed

Okay, here it is...

I am really glad that I got that dovetail template. I used no fasteners to put these cabinets together, and only used Elmer's carpenters glue.

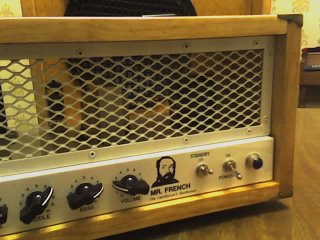
If you are looking for amp porn, you will have to read an earlier post. This is the most I will give you.

In case you think the Sears Tower and Mr. French mean anything - they don't. Think of it as a postmodern flair. I did it because I can.

A few hours ago, this was just a sheet of expanded metal and an length of aluminum angle-bar. Fabrication is something that I have never done in my previous lives. I think I would have enjoyed it. I loved building custom plenum for a plumbing and heating company I worked for.

I think that's why I like those shows where they build motorcycles from scratch. I don't want to build motorcycles - I just want to play with the fabrication tools.
I am not proud of the jack plate on the speaker cabinet. It is the only thing that did not arrive before I started building (Musicians Friend!)

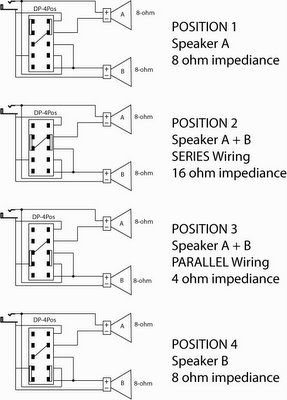
The speaker cabinet is a 2x10, and the switch below gives me all options (just A, just B, both in series, both parallel). I was going to put that cool looking metal jack plate in, using a nibbling tool to make room for the switch. Right now it is a horrid plastic deal from the shack. Here's the wiring diagram in case you missed that before.


This is a lot more satisfying than finishing the upstairs hallway and starting on remodeling the master bedroom. I think I can start those things now that I got this out of my system.

Oh yeah, it sounds great too.

--gh

Tuesday, March 21, 2006

Slight 120hz hum

When I got back from Chicago, I had no time to put into the amplifier. It took me a week to get the board soldered up.

I was very nervous about wiring the components. Some things can be destroyed if they are wired incorrectly - and this was the first time I ever attempted something like this.

If I blew a transformer or damaged a fuse - then I would be sunk. I doubt I can find some of these components any where around here. Here is the final build with the tubes installed. I do not plan to modify this into another amp, so I finally filled the extra tube socket hole with a little Sears Tower souvenir. (Note that it will protect the tubes if I do something dopey like turn it upside down to work on it!)

I did not have much free time last week, but this week is different. It is Spring Break, and this is what it looked like outside on the first day of Spring.

Now it is time to build the cabinets for the amp head and the speakers. Right now they are downstairs being glued up. Here is what they looked like this afternoon, before glue.

The mini speaker cab is going to be cute.

Oh man, I didn't talk about the amp. Luckily I have a sad amp with an 8ohm speaker in it. I pulled the cable so that I could plug my new amp into it. I will fix that amp some day, but I didn't mind using its speaker as a test.

So, I fired it up at just before midnight, Sunday night and it worked! There was a fairly strong 120hz hum. On Monday morning I moved one of the filament wires on the output tube and knocked most of this hum out. It is still a little too much for my taste, so I will keep playing around with some of the lead dressing until I find the culprit. I might test some of the filter caps, I should have picked one up today when I was at Radio Shack. The 120hz might be some ripple from the power stage.

But, I will keep working on the cabinets and make it easy to take the amp in and out of the head to make adjustments and poke around. The sound is incredible - I cannot believe I went this long without a tube amp.

--gh

Thursday, March 09, 2006

Chicago, Day 2

Playing Peek-a-boo!


Our second day in Chicago was pretty full. If I had to guess, I would say that we hiked 8-10 miles yesterday. We walked to the Sears Tower twice, because the sky deck wasn't open the first time.

I was taking a picture of this advertisement when the owner flipped the closed sign on the door to "open." He came out and asked us questions such as whether Grills like these were popular in our town.


The kids got a big laugh out of that.

Today, we'll have the Art Institute, I have a chairs lunch -- oh yeah, and my presentation is this afternoon. Should be enough for a day.

--gh

Wednesday, March 08, 2006

Chicago got in the way of amp building...

Well, my amp project will be put on hold this week because of this trip to Chicago. Both kids are with me, and we are at the Palmer House downtown. This is an amazing old-style hotel.

Chicago Skyline:


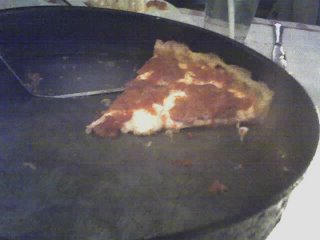
Deep dish pizza from Pizanos:


I am glad that parking is only $25 / day. I expected 50-60% more. I am a little hacked that I had to purchase internet access at $10 / day, though. That is an outdated price structure that most hotels now offer for free.

I should take a few pictures of the kids today, they really are with me.

--gh

Sunday, March 05, 2006

Primary components loaded

It is hard to believe that 48 hours ago, my amp was just a bunch of parts and a blank aluminum chassis. Here it is with the pots, knobs, switches, input jacks, transformers, and lamp loaded:


The clearcoat did a great job of covering up the white paint (flat) and my ink drawings, it is about twice as good as anything I *thought* I could make.

I will put more effort into this step on my next amp (wishful thinking, huh) because to be honest I had no idea it would even work. I really imagined spending an hour penning the faceplate and then seeing it melt when I sprayed it with lacquer. (If that happened, it probably would have looked cool!)


You may think that the lettering looks fancy, but to me all I see is tax maps, with wording that looks like this:
4.01
80 Ac.
79.59 Ac.(c)

Maybe some time I will create an amp that is stylistically based on such maps, with lines, parcels, roads, North arrows and stuff on it. I would not put it in a cabinet, but leave it out for that cool effect. That would be my office amp!

The clear coat did not drip as bad as I thought - but it is VERY noticeable. I have to learn to be more patient with spray painting.


Notice how optimistic I am about my date of completion.


Well, I have to get on the actual guts of this amp, but first I have a business trip in Chicago. I am going to be thinking about soldering this thing up for a week! Oh well, I know I will finish it before Spring Break is over. (I am 37 years old, and I still get to say 'Spring Break' like someone 20 years younger than me.)


--gh

Saturday, March 04, 2006

Mr. French's Chassis

I mentioned last time that I needed to design and paint the chassis of the amp first. Unless you don't mind junk, amp building really needs to be planned, designed, and layed out with good preparation.

Here is a picture of what the amp chassis looks like:

In case you are wondering, I paid an amp parts service to punch and drill the chassis. If this one works out well, then my next tool will be a drill press and I will do that on my own.

I did settle on calling this first amp build "Mr. French," which comes from the 60s TV show Family Affair. Here you can see that I simplified a layout template and cut out critical areas with an X-acto knife.


Some of my Geo-Tech students may recognize how I will layout the front plate. Instead of Mylar, I will draft directly onto the front of the chassis. I had a huge block of oak leftover from a previous project, and I just clamped the chassis on at the same level. (Sorry for the picture quality. My motorola phone only has VGA-quality pictures, and no flash. Some day I will get a digital camera.)


I really took a chance that this would work. I primed the chassis, and then painted it with a flat white. My hope was that I could draw with rapidograph pens directly onto the chassis with India ink. This is water soluble, so I can have a little play while I am working on it. Water soluble means that once the water leaves, there is nothing but dry ink (with a healthy dose of clay in India ink), which means that I should be able to clearcoat it afterwards. Here is the beginning of the layout. Check out the Leroy lettering system!
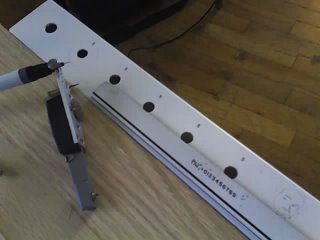

This is starting to look like I know what I am doing. Here is the back of the amp. It is very critical to have the speaker output labeled, so I wasn't just being fancy here. If you don't plug a speaker into a tube amp like this, you will fry your output transformer, and probably the tube as well. Mismatching impedances could be just about as bad. (For a visual image, imagine placing your screw driver right across the car battery - the battery wants a load and does not want to just short out to nothing like that.)


I am finished with the faceplate layout. I am impressed with how this will work (assuming the clearcoat doesn't mess things up). A lot of amp builders struggle with the face plate - sometimes paying $50 for someone to laser cut a decent design. This won't look as nice as that, but it only cost time (about an hour) and about three cents of ink.

Faceplate:


Mr. French closeup:


Input (blacklinefish name) closeup:


Issues - you may notice that the layout of the numbers is not perfect. I also hope that they are centered okay when the knobs are installed. Also, the "t" in the phrase 'The Gentleman's Gentleman" is darker - that was me trying to touch up something I already lettered by hand. It usually doesn't work so I wish I had left it alone.

I wrote "STANDBY" above the switch because the words for "MR. FRENCH" got in the way! Also, the reason I wrote "POWER-off" like that is because I only wanted to use the word "POWER" but I got lazy with the layout and it was no centered well under the hole for the switch. I did not feel like erasing the word because that would have taken 45 seconds or something. So, it permanently has this distinctive layout. (The hole on the farthest right is a lamp, in case you are wondering why it is not labeled.)

--gh

P.S. Here's the funniest thing so far. All those years of manual cartography and cadastral mapping really paid off with making this look more than amateur. But I haven't spent too much time with a can of spray paint. (No, I did not spend my youth tagging.) So, the clearcoat went on really nice, and all of the lettering really darkened up nicely. However, I was a little heavy on the first coat, and it may be a little drippy looking. Still, I think it will work out fine.

Friday, March 03, 2006

Sebastian Cabot

I think I have almost everything I need to begin work on my amp. This has never occured to me, but the amp chassis has to be painted first, before assembling and mounting everything. It's probably a good thing so that you aren't throwing paint around and risking getting some components sprayed, causing heat dissipation problems.

Here's another reason this may be a good thing. If painting and lettering the chassis was done after it was assembled, then a lot of homemade amps would have bare metal and labeled with a Sharpie. (I know I would have a hard part decorating, when all I wanted to do was hear it!)

So, my chassis got a good dose of primer and flat white paint this evening. I will try to share some pictures later. My goal is to try and lay out something that looks like this in India ink tomorrow:


I have never attempted to letter anything other than a sheet of paper, and my skills are a little rusty. But, maybe I can still be successful. I also wonder if I can do a good job sketching Mr. French with a rapidograph pen. (Afterward, the flat white background and the black lettering will be encased in a clear lacquer.)

We will see tomorrow.

...

In other news, I finally got my guitar back. Leo did a great job on the fretboard planing. I can tell that he had to partially plane over 3/4 of the fretboard. (You can tell what was planed by the color of the binding, the yellowish binding is bright white where it was planed down.) There was a pretty good dip from the 7th to 12th fret, and a hump at the 16th fret. It is perfectly smooth now.

The frets feel great. With new frets, and an even fretboard, the guitar is playing like brand new. Because the previous frets were almost worn to the board, the new frets even make the notes sing out more. It's a little amazing how much I tolerated.

The neck was a little sticky, so I spent some time on it with 000 and 0000 steel wool. I almost have no finish at all on most of the neck, which I prefer. With the steel wool, I can make the neck feel like glass.

--gh